[April 30, 2017]
Ever since I was a little kid I have drawn pictures. I used to get up really early on Saturday mornings, sit myself on the floor at the coffee table in front of the TV, and draw the characters from my favourite cartoons. I would draw for hours, totally lost in my creative pursuits, barely taking the time to eat breakfast or lunch. I would draw so intently and with such passion that by lunchtime my fingers would ache from overuse. At that point my mom would usually step in turn off the TV and tell me it was time to go outside and play. I still have a huge callus on my index finger from those early days. You will be happy to hear that in my adulthood I have learned to stop drawing before my fingers start to ache.
In my 47th year not much has changed. I still enjoy watching cartoons, but now I spend my time drawing my own characters and not the ones that I see on TV. It may surprise you to know, however, that drawing doesn’t come easily for me. The pages that you see in my graphic novel are a result of numerous rough drawings, comprised of stacks of under-drawings that I produce in order to create a pleasing composition. My artistic process is one that I have honed over the years; one informed by my time in the Illustration program at OCAD University, and perfected by my experience as a freelance editorial illustrator.
To understand my process you first have to understand how I draw and perceive the world. Most of the artists that I know see the world in shape, volume and form. For some reason I see the world in linear form. In other words, things seem flat to me--they are defined and held together by an undulating line not grounded and supported by shape, volume and form. This way of seeing things made my life drawing sessions at OCAD difficult and, at times, frustrating. Though I learned my anatomy lessons well, my drawings were never quite as good as my classmates who seemed to effortlessly recreate what they were seeing.
Things changed for me when I took a class from Bill Biddle, entitled “Constructing the Figure from Memory”. In that class I learned to construct the figure using basic shapes, and that is the fundamental principle that I now use in the creation of my work. The figures that I draw in my graphic novel are constructed first by using basic shapes and are completely imagined and not drawn from life. I build my drawings upon this foundation, which I suppose is why I have to do so many preliminary sketches. Plus, a monster’s anatomy is sometimes hard to figure out.
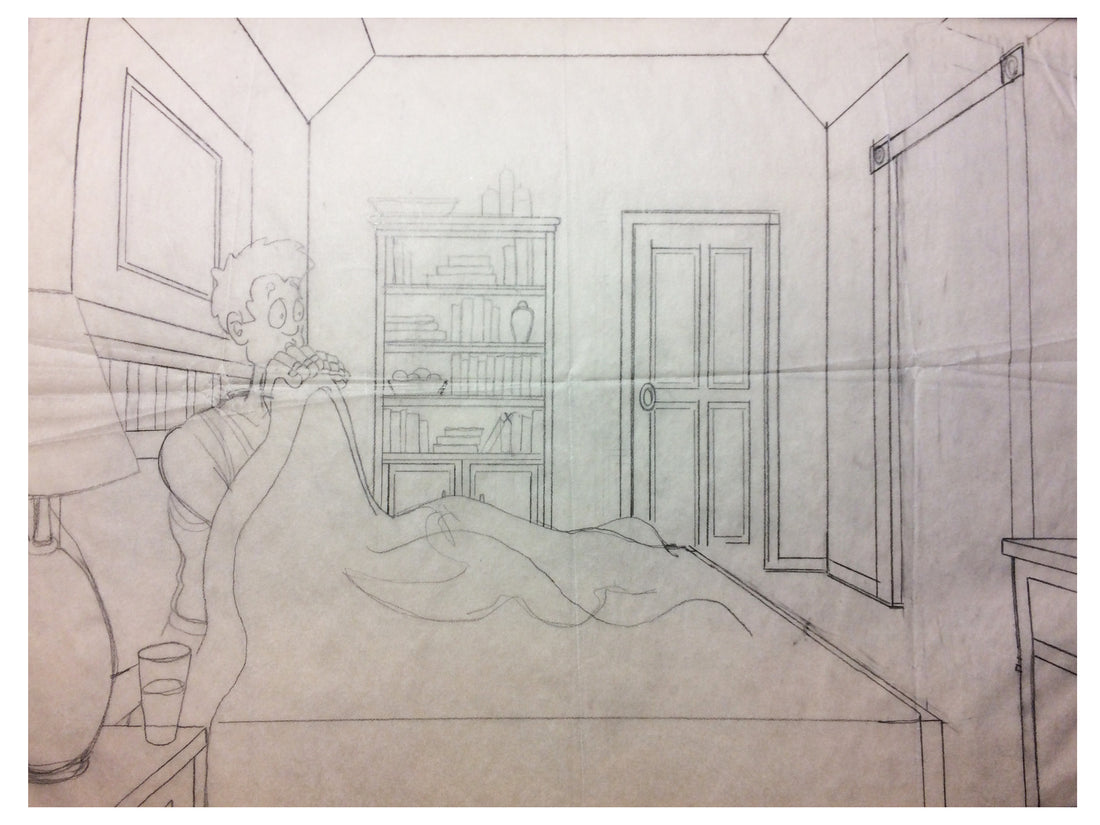
To give you a better understanding of how I work let me take you through the steps of creating a page for the book.
Step 1: Thumbnail Sketch
On an 8.5 x 11 piece of paper I decide what the layout of the panels will be. Once I have decided on the layout template, I do a very rough (thumbnail) sketch depicting the action in each of the panels. This opening sketch can be very loose - sometimes with figures constructed using only basic shapes- or can be very tight; showcasing lots of detail. This stage is where I do most of my thinking and composition building and it also serves as the first storyboard laying out the pace and viewpoints of each panel. At his stage, I also have to make sure to leave dead space for the dialogue balloons.
Step 2: Linear Sketch
I take the thumbnail sketch and blow it up in sections on a photocopier to 200%. Enlarging it allows me the opportunity to put in lots of details. Once I have copied it, I assemble the sections and I utilize tracing paper to refine the rough sketches into finished drawings. At this stage, I often layer the tracing paper to refine the drawing until I can get it quite right. This allows me the opportunity to just retrace the sections of the drawing that are working and rework the sections that are not. I often use this technique to refine detail such as hands that are hard to position in a first draft. My studio is sometimes ankle deep in tracing paper by the end of this process.
Step 3: Final Illustration with Colour
In sections, I take the large-scale linear sketch and scan it into the computer. In Photoshop I piece the sections together and reduce the image back to its original size of 8.5 x 11. At this stage, using the mouse, I trace the image in black on a layer in Photoshop and, once the image is traced, I eliminate the bottom layer and flatten the image. This allows me to use the vector tool to drop in the colours and simulate the proper lighting of each panel. Once the colours are in place I usually have to retrace the outline to make sure it remains consistent. Those of you reading this are probably asking yourself “Why didn’t you use a pen and tablet?” Well, at the time I started this project that technology didn’t exist and to change mid-way through the book would have made the pages inconsistent. My process had to remain the same so the pages at the front of the book looked like the pages in the back.
Step 4: Finished Strip with Word Bubbles.
Once the colour is complete in another Photoshop document, I layout the word balloons and then cut and paste each balloon in the appropriate place in the strip.
As you can see, my process is somewhat labour-intensive. I imagine that most comic book artists have a more simplified process, but this is the one that works for me. On the next book I will probably invest in a pen and tablet and revise my process so that the work will not take as long to produce but, that said, I am proud of what I have produced regardless of the effort extended.
I don’t know if it is rare for little boys to get the chance to grow up and follow their childhood dreams but I was blessed to be able to follow mine. Thanks Mom for rubbing my fingers when they were sore. Thanks Bill for teaching me how to tap into my potential. Thanks Stacy for believing in me and supporting this project from the beginning.